Cabinet Painting
If you're looking to transform the look of your kitchen without breaking the bank, repainting your kitchen cabinets can be a fantastic option. Lou's Painting Company specializes in painting kitchen cabinets and can help you achieve a stunning makeover with their expert techniques. In this article, we will guide you through the process of painting kitchen cabinets, covering everything from the tools needed to the number of coats required for a flawless finish.
First and foremost, let's talk about the tools required for this project. First, a high-quality paintbrush or a paint sprayer is used to achieve superior results. A paint sprayer can save time and deliver a smoother finish, but a brush can provide more control over smaller details. Additionally, a roller and tray for larger surfaces are needed at times. All tools can be used depending on the project. We also use painter's tape and drop cloths to protect the surrounding area from paint splatters. All these tools are typically needed to achieve the right result!
Before beginning painting, adequate preparation is crucial. We start by removing all cabinet hardware, such as knobs and handles. Next, we thoroughly clean the cabinets to remove any grease or grime buildup. TSP (trisodium phosphate) or another degreaser can be used for this purpose depending on what is available then. Once cleaned, we lightly sand the cabinets to create a rough surface that will help the paint adhere better. We wipe away any dust afterward to ensure a clean painting surface.
After preparing the area, it's time to prime the cabinets. Priming is an essential step as it helps the paint bond well and provides a smooth base. We apply an oil-based or latex primer using a brush or roller, ensuring even coverage across all surfaces. Then we allow the primer to dry completely before moving on to the next step.
Now comes the fun part – painting the cabinets. Use a high-quality paint suitable for cabinets, preferably a satin or semi-gloss finish that can withstand regular cleaning. Using a brush, we paint the inner edges and smaller details, carefully following the natural grain of the wood. For larger flat surfaces, a foam roller can produce a smoother finish. We apply thin, even coats of paint, allowing sufficient drying time between coats as per the manufacturer's instructions. Typically, two coats of paint should be sufficient, but you may require additional coats for darker or more dramatic color changes, each situation is different.
Once we have achieved your desired paint coverage, we let the cabinets dry completely before reattaching the hardware and reinstalling them in your kitchen. Here we take this opportunity to inspect the cabinets for any imperfections and touch them up as needed.
By following these steps and utilizing Lou's Painting Company's expertise, you can transform your kitchen cabinets into beautiful focal points that enhance the overall aesthetics of your home.

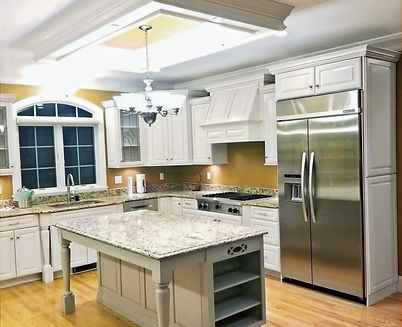
Finished Kitchen Cabinets
Here the painters carefully painted every part of the kitchen, making sure it all got a fresh coat of paint. They worked hard to cover everything evenly and neatly. The new colors made the kitchen look fresh and welcoming.

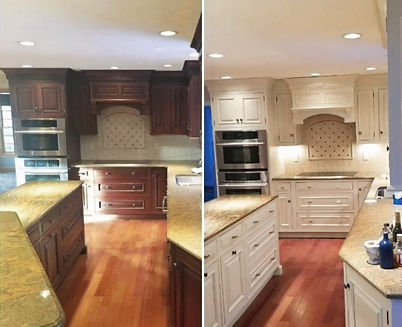
Before and After Completed Kitchen Cabinets
The above picture clearly displays the before and after of the kitchen cabinets. In the before image, the cabinets appear worn and outdated. In the after image, they shine with a fresh coat of paint, rejuvenating the kitchen's look and adding a sense of modernity.

Cabinets Painted White
Each stroke here was applied meticulously, resulting in a smooth finish that highlights its clean lines and sharp edges. The painter's precision is evident in every detail, showcasing a pristine and immaculate appearance.

Cabinets Painted Dark Gray
Here the cabinet surface was flawlessly painted. With precise strokes, the painter achieved a smooth, bold finish, highlighting its sharp edges. It exudes sophistication and elegance, commanding attention with its rich hue.


